Friday, July 25, 2008

Egypt Vacation

So, and finally I got to enjoy a vacation after 4 years in Canada and the US. I spent most of the vacation in my condo in El-Rehab City http://www.alrehabcity.com and in Alexandria.

Here is some pictures.


Build events and relative paths

When working with post/pre build events note the following.


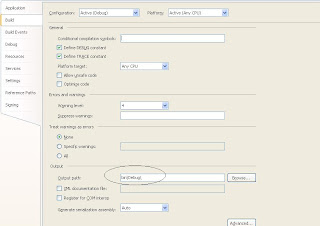
1- The build event default path will be the project output path. Everything you write in the build event will be relative to the project output path. So for example. If your application is located at c:\project and it is configured to output things to bin\debug, then your project absolute output path is c:\project\bin\debug. If your output path is different, let’s say it is “..\bin\debug” then your project absolute output path is c:\bin\debug and everything you work on in the build events will start from c:\bin\debug.
The screen below shows how to set the project output path.


Now, when writing a build event paths in a build event, the relative path you use will be relative to that absolute output path which is c:\bin\debug. Ex A post build event like the following will copy the app.config file from c:\config to the output path

Xcopy ..\..\config\app.config *.* /c /y /q


basically the above statement is saying two levels up starting from the absolute project output path which is c:\bin\Debug , that will be C:\ and then it says go to Config folder and get the app.config.


Easy?


now assume you want to to copy a dll

From

C:\TFS1\ASC\ASC.CustomValidations\bin\Debug

To 
C:\TFS1\ASC.PM\ASC.PM.AccountServiceLibrary\bin\Debug 
and your project absolute path is C:\tfs1\ASC.PM\ASC.PM.AccountServiceLibrary\Bin\Debug


Here is what you need to type into the post build event 
xcopy ..\..\..\..\ASC\ASC.CustomValidations\bin\Debug\ASC.CalendarServiceAgent.dll.config


this is 4 levels up starting from the project absolute output path

that's 4 levels up from

C:\tfs1\ASC.PM\ASC.PM.AccountServiceLibrary\Bin\Debug

and that would be

C:\tfs1\


now go to ASC\ASC.CustomValidations\bin\Debug\ASC.CalendarServiceAgent.dll.config starting from c:\tfs1


and that would be 
C:\TFS1\ASC\ASC.CustomValidations\bin\Debug


and your target folder is the same as your absolute output path so you really do not need to type any path as a target path, so you just type *.*


Wednesday, July 23, 2008

ClickOnce for just about anything

Close your eyes, take a deep breath, click your heels three times, and say, "There's no better thing than ClickOnce"

With ClickOnce releasing a new version of your software is really a piece of cake, imagine the possibilites you have when you can push a new version to all your clients at once.

ClickOnce is great if you know how to use it and get around the limitations imposed in the Visual Studio IDE. using Mage and MageUI you can build unlimited ClickOnce deployment that can deploy any application easily and quickly. Please read on to know how to leaverage the full benefits of ClickOnce and overcome the Visual Studio limitation.

If you’re building a solution that contains multiple projects, then you will have a problem creating a ClickOnce deployment for it. ClickOnce will not collect the files of your other projects in the solution. In addition if you have any additional files to add to the deployment this is currently not possible with ClickOnce because the Application Files dialogue below will not let you add files to the deployment.


Luckily there is a way out of this using MageUI.exe which is Manifest Generation and Editing Tool, Graphical Client.
(You can read more about this tool here but you don’t really need to http://msdn.microsoft.com/en-us/library/xhctdw55(VS.80).aspx).
Using this tool you can build your ClickOnce deployment using any number of files located in a folder by following the steps below.

1- Build your solution and make all of your files in one folder (dll’s, exe, doc files, pictures, everything) ex. C:\bin
2- Decide what is the publish location that you want users to install your program from for the first time (ex. \\aali\Install)
3- Copy all the program binaries from c:\bin to the publish location under a bin folder ex. file://aali/install/bin
4- Delete *.application and *.manifest from the publish bin location (file://aali/install/bin) if you have any .application or .manifest files there, then your deployment will fail
5- Start MageUI by opening a Visual studio dos window (not the regular dos window) and type Magui.exe. When MageUI start click the first icon to the left in the tool bar. This icon will help you build an application manifest. The application manifest is an xml file that lists all the files in the folder file://aali/install/bin . To create this manifest. Type the publish bin folder in the “Application Directory” text box below (ex. file://aali/install/bin) and then click populate.


6- In the Name tab , enter a name for the application and a version


7- Save your manifest using the save button. The manifest has to be signed either with a stored certificate or a new certificate. Press the save button and when prompted click New as follows


When prompted enter any name for a certificate and then press Save and then Ok

Save the manifest file to the publish bin folder (file://aali/Install/bin)

8- Now you need to create a deployment manifest. The deployment manifest will have an .application extension and must be located in the publish folder (file://aali/install) directly not in the bin folder.
9- To create he deployment manifest click the second icon on MageUI tool bar and enter a name, and version number in the name tab

10- In the Application reference tab select your application manifest using the “Select Manifest” button and select the application manifest that was created in the previous step.

In the description Tab enter the product name, and then in the Deployment options tab enter the full path for the deployment manifest as follows


Save and sign this deployment manifest using the same certificate that you created in the previous step.
When saving the deployment manifest you need to save it to the publish folder not to the bin folder.

Now any user that points to file://aali/install/PC.application will get your application installed with all its files even if there were doc files, pictures, database files.
You can set the update options from the Update Options tab which is a self explanatory tab.

If you come up with a new version to your application you can repeat the same steps above to create a new deployment file with a higher version and updates will be done automatically to those who installed your application previously.

If you encountered any problem during the save, read the message carefully and you will be able to figure out what the problem is. I had to deal with two errors one was because I did not delete *.application and *.manifest and the other because I was trying to deploy .Net libraries which are installed already on the target computer (ex. System.data.dll or System.web.dll)

To automate this process using a batch file, here are the lines that should be in your batch file. Let's assume that this batch file is called UpdateDeployment.bat and it takes four parameters


Parameter %1 = Bin Source , %2 = Config Source, %3= Destination , %4 = Version

----------------- The batch file Begin ---------------------------
cls

mage -New Application -ToFile %3\%4\pc.exe.manifest -Name "PC" -um true -pub "Ayman Company" -Version %4 -FromDirectory %3\%4\

mage -Sign %3\%4\PC.exe.manifest -CertFile "c:\ClickOnce\PC.pfx"

mage -New Deployment -ToFile %3\PC.application -Name "PC" -Version %4 -AppManifest %3\%4\pc.exe.manifest -providerUrl %3\PC.application -i true

mage -Sign %3\PC.application -CertFile "c:\ClickOnce\PC.pfx"
------------------ The batch file end --------------------------

To call your batch file you will need to provide four argument as follows

UpdateDeployment.bat c:\bin c:\config \\aali 1.0.0.1


Prerequisites:
Prerequesites are located at C:\Program Files\Microsoft SDKs\Windows\v6.0A\Bootstrapper\Packages

if you have visual studio 2008 (if you can't find this location, try to guess it according to your installation of Visual studio and windows)

use bootstrap generation tool and create a prerequisite and then use Visual studio to create one boot strapper which will create one setup file that will install all the prerequisites.


And that will be it, hope that helps.

Validation Application Block

Starting to implement the Microsoft Validation Application block which I believe is somewhat cool, the following links gave me a good kick start


http://www.codeproject.com/KB/cs/VAB.aspx


http://msdn.microsoft.com/en-us/library/cc511770.aspx
http://www.codeproject.com/KB/WCF/WCFVAB.aspx

In general the validation application block allows you to add configurability to your service and UI validations. in this post I will talk briefly about what you need to do to implement VAB in your service and UI starting with the service.


Service Validation using VAB


So you have a service that contains some operations, to implement VAB you will have to modify every operation to make a call to

ServiceValidator.Validate(InsertRequest.AccountObject, MethodBase.GetCurrentMethod().Name)

all of the above is a custom code that you actually write, the ServiceValidator is a class that you should have built, and it containts the Validate method.

The first parameter to Validate is the object that you want its members validated. Here I want to mention one of the VAB limitations. the limitation is that you need to provide the object that you want to validate which is "InsertRequest.AccountObject", this object should be the direct parent of all the members (Fields, Properties) that you want to validate. VAB configuration will not let you start from "InsertRequest", it will only show one level down from the Type that you select in the configuration file and you can not drill down more. so if you start with InsertRequest, then you will only be able to set validation rules on AccountObject which is the direct child of InsertRequest class. but you can not set rules on members of AccountObject itslef.

To illustrate this in further consider the diagram below.


In the diagram above, you see under the InsertAccount "rule set" you can choose the members of the parent type (Account). in case your parent type is InsertRequest you will not be able to access the grand children (AccountNameInternal), and this is why you will have to start with the parent object of the members you want to validate.


the validate method itself should call the enterprise library validate method, here is a sample code


public static class ServiceValidator
{
public static void Validate(T validationTarget, String ruleSet)
{
ValidationResults results = Validation.Validate(validationTarget, ruleSet);
if (!results.IsValid)
{
StringBuilder validationMsg = new StringBuilder();
int msgNumber = 1;
foreach (ValidationResult valResult in results)
{
validationMsg.Append("Service Reply " + msgNumber + ": ");
validationMsg.Append(valResult.Message + " {Key= "+ valResult.Key + ", Tag= " + valResult.Tag +"}\n");
msgNumber++;
}
throw new Exception(validationMsg.ToString());
}
}
}


the Validation class referenced above is located at
Microsoft.Practices.EnterpriseLibrary.Validation


when you want o send the validation result to the caller, you usually do that via Faults. so you need to send a Fault back to the caller.

the exception thrown in the code above will need to be captured at the service boundary and convereted to fault and this is the only way it can travel safely thru the wire back to the caller.

you can use srvcconfig and srvcmonitor applications to monitor what is actually travelling thru the wire.

the code below shows how to capture and convert the exception to a Fault.

public void ProvideFault(Exception error, MessageVersion version, ref Message fault)
{
ValidationFault validationFault = new ValidationFault();
FaultException fe = new FaultException(validationFault, error.Message);
MessageFault mf = fe.CreateMessageFault();
fault = Message.CreateMessage(version, mf, fe.Action);
}

he above function receives your exception and converts it to a Fault and sends it over.

The best practice in handling Exceptions in the service is to handle the exception at the service boundary. A good way of doing this is to create an attribute as follows


public class ServiceExceptionHandlerAttribute : Attribute,IServiceBehavior
{
#region IServiceBehavior Members
public void AddBindingParameters(ServiceDescription serviceDescription, ServiceHostBase serviceHostBase, System.Collections.ObjectModel.Collection endpoints, BindingParameterCollection bindingParameters)
{
}
public void ApplyDispatchBehavior(ServiceDescription serviceDescription, ServiceHostBase serviceHostBase)
{
foreach (ChannelDispatcher dispatcher in serviceHostBase.ChannelDispatchers)
{
dispatcher.ErrorHandlers.Add(new ServiceExceptionHandler());
}
}
public void Validate(ServiceDescription serviceDescription, ServiceHostBase serviceHostBase)
{
}
#endregion
}

the attribute references the class ServiceExceptionHandler which is implemented as follows


public class ServiceExceptionHandler : IErrorHandler
{
public bool HandleError(Exception error)
{
//ASCLogger.LogError(string.Format("Uncaught exception of type {0} was thrown. Message: {1}", error.GetType(), error.Message),true );
return true;
}
public void ProvideFault(Exception error, MessageVersion version, ref Message fault)
{
ValidationFault validationFault = new ValidationFault();
FaultException fe = new FaultException(validationFault, error.Message);
MessageFault mf = fe.CreateMessageFault();
fault = Message.CreateMessage(version, mf, fe.Action);
}
}

Now if you decorate your service with this attribute you're all set in handling every single exception and converting it to a fault and passing it back to the caller.


Validating User Interface

To use VAB in the UI you need to add an ErrorProvider which comes with .Net and a ValidationProvider which comes with the enterprise library to your form. Attach the ValidtionProvider to the ErrorProvider and attach your control to the ValidationProvider.

Couple of things to note here.
1- UI and service can not share the same validation file if they do not share the data contracts. In your UI you will most probably have a service agent that copies the service objects in the UI. When you try to add the same type to the config file it will be refused.
Also there is a nice little trick about using the load assembly functionality when you add a new type to the validation config file. if you are like me irritated by the long list of objects that appears after you add an assembly, you can use this trick


after adding your assembly, select any object from the list and then press ok, then delete the object that you just added to the config file and then click to add a type again, you will now see the same diagram above but all the types will be in a collapse mode instead of an expand mode.

VAB will only help you validate simple things like text box, drop down. but if you have a grid for example, you will have to write a custom validation, which I did not like so much.